10 Must-Try Nail Art Ideas to Transform Your Manicure Game
Your nails are the perfect canvas to express creativity and personality. A well-designed manicure can instantly boost your confidence, complement your outfit, and even reflect your mood. Whether you’re into chic minimalism or dazzling, eye-catching designs, there’s something for everyone. In this post, we’re showcasing ten must-try nail art ideas that blend modern trends with timeless styles.
1. Minimalist Magic
Embrace the beauty of simplicity with clean lines and neutral tones. Minimalist nail art emphasizes negative space and delicate accents for an effortlessly chic look.

Step-by-Step:
- Start with a clear or nude base coat.
- Use thin nail tape or a fine brush to create delicate designs like tiny dots, single stripes, or geometric shapes.
- Opt for neutral or muted colors such as white, beige, or soft pastels.
- Seal the design with a high-gloss or matte top coat.
Picture this:
Your nails exude elegance with subtle, well-placed accents. A soft nude background with a single gold stripe adds just the right touch of sophistication. Perfect for everyday wear or a minimalist-chic outfit!
2. Bold & Bright Designs
Make a statement with vivid colors and graphic patterns. Think neon accents, contrasting hues, and eye-catching shapes that are perfect for a summer pop.

Step-by-Step:
- Choose a bright base color—think neon pink, electric blue, or sunny yellow.
- Use contrasting colors to create abstract shapes, color-blocking, or vibrant swirls.
- A fine-tip brush or nail stamping tools can help create precise, dynamic patterns.
- Finish with a glossy top coat to enhance the vibrancy.
Picture this:
Your nails pop with dazzling hues of pink and orange, accented by bold black lines. They’re the ultimate accessory for a fun night out or a summer beach day!
3. Floral Fantasy
Bring the garden to your fingertips with delicate floral patterns. This design can range from tiny blossoms to bold, abstract petals that add a whimsical touch to your nails.

Step-by-Step:
- Apply a pastel or nude base coat for a soft backdrop.
- Use a dotting tool or fine brush to paint tiny flowers, petals, or vines.
- Add details like gold accents or tiny leaves for extra dimension.
- Seal with a glossy or matte top coat to preserve the design.
Picture this:
Imagine dainty pink cherry blossoms blooming on a soft beige background, giving your nails a romantic, dreamy aesthetic.
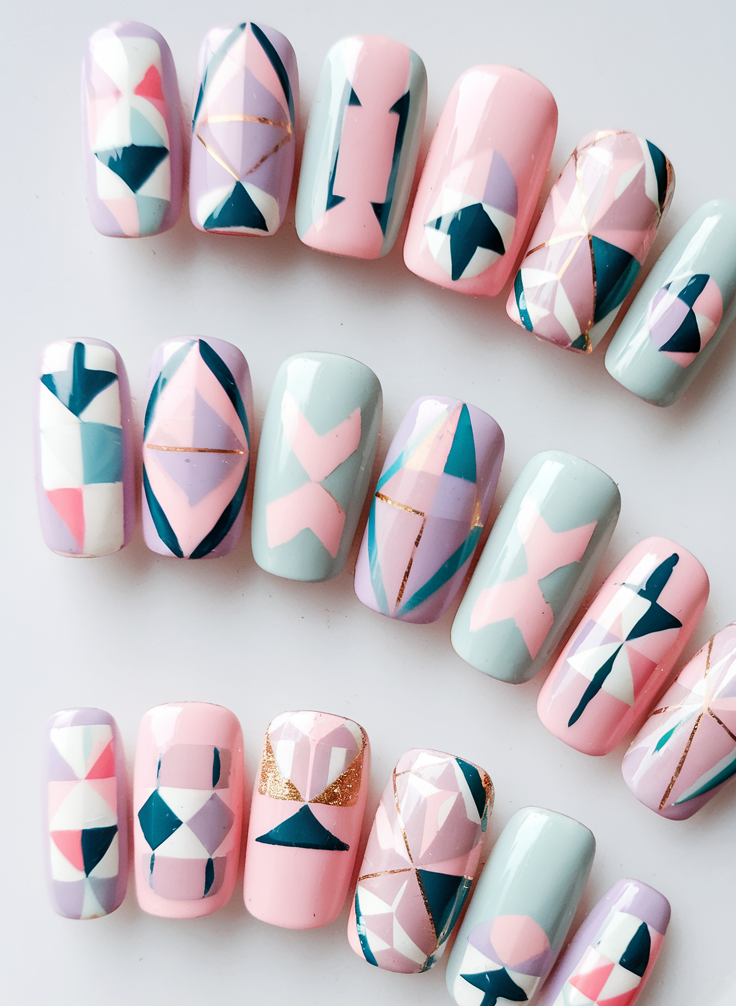
4. Geometric Patterns
Incorporate modern art with crisp lines and shapes. Geometric nail art uses angles and symmetry to create designs that are both trendy and unique.

Step-by-Step:
- Apply a neutral or dark base color.
- Use striping tape to create sharp angles and clean lines.
- Fill in some sections with bold colors or metallics for contrast.
- Remove the tape and finish with a clear top coat.
Picture this:
Your nails resemble a modern art piece, featuring sleek black lines against a nude backdrop, accented with a pop of metallic gold.
5. Marble Elegance
Achieve a sophisticated, textured look with marble nail art. The subtle blending of colors mimics real marble and works well for both everyday wear and special occasions.

Step-by-Step:
- Start with a white or light gray base coat.
- Using a thin brush or a water marbling technique, swirl black and gray polish lightly onto the nails.
- Blend the edges for a natural, seamless effect.
- Apply a glossy top coat for a polished finish.
Picture this:
Your nails exude elegance with a delicate marble design, making them the perfect accessory for any stylish occasion.
6. Ombre Gradient
Transition seamlessly from one color to another with a beautiful ombre effect. This design creates depth and dimension, perfect for an understated yet elegant manicure.

Step-by-Step:
- Choose two or more colors that blend well together.
- Apply the lightest shade as a base.
- Use a makeup sponge to dab on the darker shade, blending it softly into the base color.
- Repeat layers for a smooth transition, finishing with a top coat.
Picture this:
A dreamy pastel gradient of pink fading into lavender gives your nails a soft, elegant touch—perfect for a romantic date night.
7. Metallic Accents
Add some sparkle with metallic details. Silver, gold, or rose gold streaks can be incorporated into any design, giving your nails an ultra-modern twist.

Step-by-Step:
- Start with a solid base color.
- Use metallic foils, chrome powders, or metallic nail polish to create accents.
- Apply the metallic touches sparingly for a chic look.
- Finish with a top coat for longevity.
Picture this:
Sleek black nails with a single gold accent stripe radiate modern luxury.
8. Abstract Art
Channel your inner artist with bold, abstract designs. Use a mix of colors, brush strokes, and even splatters to create a one-of-a-kind look.

Step-by-Step:
- Pick a neutral or bright base color.
- Use a fine brush or a dotting tool to create abstract shapes, swirls, or brushstroke effects.
- Mix and match colors freely—there are no rules!
- Seal the design with a clear top coat.
Picture this:
Your nails look like a miniature canvas, each one featuring a different artistic swirl of color, as if straight from a modern art gallery.

9. Sparkle & Shine
Who can resist a bit of glitter? Whether you opt for full-on sparkle or subtle glitters, this design is perfect for when you want your nails to shine.
Step-by-Step:
- Apply a solid base coat in your chosen color.
- Use a glitter polish or loose glitter to highlight tips, cuticles, or full nails.
- For extra sparkle, layer different sizes of glitter.
- Apply a top coat to lock in the shine.
Picture this:
Your nails twinkle under the light, covered in a mesmerizing holographic glitter that catches every eye.
10. Seasonal Themes
Celebrate the seasons with designs that reflect nature’s palette—from icy blues in winter to bright florals in spring. Seasonal nail art keeps your look fresh and timely.

Step-by-Step:
- Pick a seasonal theme (e.g., icy blue for winter, florals for spring, warm tones for fall).
- Incorporate elements like snowflakes, leaves, or holiday symbols.
- Use a mix of colors and textures to bring the theme to life.
- Finish with a protective top coat.
Picture this:
Your nails shimmer with icy blue and white snowflakes, making them the perfect winter wonderland accessory.
Conclusion
Nail art is a fun and stylish way to express your personality. Whether you go for minimalist elegance or bold statement designs, there’s a look for every mood and occasion. Which idea will you try first? Don’t forget to share your creations on Pinterest and tag us for a chance to be featured on pastelglow.com!